SPORTS CARNIVAL MANAGER
Contents
- 1 SPORTS CARNIVAL MANAGER
- 2 INSTALLATION
- 3 SETTINGS
- 3.1 Setting up a new carnival
- 3.2 Carnival Info
- 3.3 Print choices
- 3.4 Age information
- 3.5 Entry details
- 3.6 Next carnival representatives
- 3.7 Final lanes & heat seeding
- 3.8 New carnival
- 3.9 Setting up teams, house etc
- 3.10 Setting up the point system
- 3.11 Setting up age and categories
- 3.12 Setting up events
- 3.13 What to do if an Event contains Heats
- 3.14 What to do if the Event is a Final
- 3.15 What else can be done from the Event details and List View?
- 3.16 What else can be done?
- 3.17 More info on Age Filtering
- 3.18 Participation Points
- 3.19 Setting up Events — Advanced Option
- 3.20 Navigating between Events
- 3.21 Adding competitors (or athletes)
- 3.22 Placing Competitors straight into an Event
- 3.23 Viewing all occurrences of the Competitor Entries
- 3.24 Adding Teams as Competitors
- 3.25 Entering Competitors into an Event
- 3.26 Relays
- 3.27 Participation Points
- 3.28 Pre-Carnival Reports
- 3.29 Setting up the Records
- 4 CARNIVAL DAY — ENTERING RESULTS
- 5 Reports
- 6 Records
- 7 Help
- 8 Tips
- 9 About the Create Finalist Button
- 10 Seeding Heats or other Time Events
- 11 Entering competitors into Events
- 12 Further contact

The Sports Carnival Manager is a FileMaker Pro database that caters for both swimming and athletics carnivals of all levels (school, district, state, etc). For a school carnival, schools enter all of their houses, races, points details, etc. They type these details once, and the events for the carnival call on them — creating very efficient and quick data entry.
Student details can be imported from your school database system. Students can be pre-entered into events or entered on-the-day as races are run. Times/distances could be entered and places and points are automatically calculated (across heats if necessary). Age and House champions are automatically calculated and can be viewed at any point of the carnival.
Finalists can be automatically created and seeded (into specified lanes) with a click of a button. Age- (or Category-) champion points can be derived from selected events and places in those events. Competitors who would represent at the next carnival are also automatically printed/viewed or exported, and a letter is available to each person (if required). Records are flagged when broken or equaled and the record information is updated after the carnival with the click of a button.
There are both pre- and post-carnival reports which include List of Events, Carnival Booklet (showing every competitor in every event when pre entered), Marshalling Sheets (completed for pre-entered carnivals and blank otherwise), full results for every Event, Male and Female results, Carnival Results, Representing competitor details, etc. Each screen has a simple help screen.
Any Apple Macintosh OS X or Windows 95, XP, 7 which can run FileMaker Pro (8 or later) can run the program. The current version is optimised for FileMaker 12 or higher (or the Standalone Version which is based on FMP v12).
INSTALLATION
The Sports Carnival Manager is usually supplied — compressed in a .zip format. Mac OS X computers will Automatically extract the zip file after double-clicking it, presenting the Sports Carnival Manager folder.
When you double-click the zip file using Windows, you will see the contents of the zip file — the Sports carnival Manager folder. Drag this folder to your Desktop. This copies the program to your desktop. You cannot use the program until you have done this.
What to do next
After installing the Sports Carnival Manager, you should rename its folder, describing that particular carnival, for example, call the folder ‘Athletics 2013’. Doing this will help you build a history of carnivals for both Swimming and Athletics.
Starting the program
FileMaker Pro version: To start the Sports Carnival Manager double-click the Carnival icon which is located inside the folder you installed.
Stand-Alone (SDK) version: To start the Sports Carnival Manager double-click the Sports Carnival Manager icon which is located inside the folder you installed.
SETTINGS
Setting up a new carnival
Before a computerised carnival can take place, a significant amount of setting-up is required. However, once a Carnival set-up has been completed, it can be used many times, year after year.
As this program is designed to be customised by each user, you will need to enter information about your carnival, the Teams that will compete; Houses in schools, the Points system you will use, the Races that will take place, whether you will be having Age or Category champions, and so on.
First decide on whether your Carnival is a Single Team Carnival, for example, students compete in a school carnival for their ‘house’ or a ‘Team & Sub-Team’ Carnival where competitors may represent their school and their ‘Region’ at a ‘State’ level for example. Hence, you would click the Settings button, and Complete the ‘Carnival Info’ Tab.
Carnival Info
On the Carnival Info Tab, Enter the Carnival Name (eg SJPS School Swimming Carnival).

Press <Tab> then Type the Carnival Date. [If your computer reverts the date to the US format, you should quit the program and adjust your Date and Time Control Panel (Mac & Win) and your International Settings Control Panel (Windows)]
Press <Tab> and enter the Type of Carnival as Pre-entered or Place Getters. These responses effect the carnival in two ways.
The Registration Sheets (Marshalling lists) print either the Competitors, for Pre-Entered, or blanks spaces.
The Tab order changes on the Event screen.
Press <Tab> and select whether competitors will be representing a ‘Single’ Team; a school ‘house’ for example, or ‘two teams’; a region or Diocese and their school. Then specify what these team(s) are, Schools, Houses, Zones, Diocese, Area, Region, State, etc.
The program adjusts itself depending on your selections. Screens and printouts will then offer the appropriate information. (Windows only)
Press <Tab> and select you want to use Competitor Age filtering. If yes, the events screen will only show competitors whose age matches the Event Details and on the Competitor screen, only the events for that competitor will be offered. This option only works with Age Entry (Prefs 3).
Note: Every event will require the possible age of the competitors to be checked on the Event Details screen.
The final selection is whether you wish to Network the Sports Carnival Manager Program. You have to be knowledgeable with FileMaker networking. It is advised to use TCP as your Network Protocol. If you have configured your version of FileMaker Pro with networking ‘on’, then simply click ‘Multi-user’. You will then be the Carnival Host. Other computers can connect to the program by choosing ‘Host’ in the ‘Open’ dialog of FileMaker Pro.
Multi-user is NOT available with the Standalone version.
Print choices
Click the Print Choices Tab and set the default print mode. This option can be changed from screens throughout the program, where printing is available.
Preview Only means print the page(s) to the screen. [The keyboard command to continue (after printing to screen) is <Enter> key.]
Print Only sends the page(s) straight to the Printer.
Preview then Print lets you see the output onscreen before you get the option to print.
Age information
Click on the Age information Tab. Click on the Age Champions field. Here you select whether you want to award Athlete champions based on their Age or their Categories [based on those set from the Categories button].

Next, select whether you want All places to count towards Age/Category Champions or only the first 3, 4 or 8 places.
Next, select whether you want to work the competitors’ ages or their Date-of-Birth.
If you enter their Date of Birth, select whether you want to calculate their ages for the calendar year (31/12/yy), or as at June 30.
Entry details
Click on the Entry Defaults Tab. When you add a new event or a new competitor, state in the Sex field whether you want them to default to Male or Female.
To speed-up data entry when creating events for a new carnival, Event Quick Entry can be turned On. This lets you click on the button which duplicates the current event, automatically creating the next sequential event. The computer beeps each time an event is successfully created, letting you know that you have in fact, created a new event. Do not use this feature if ‘higher number’ events already exist.
When using Event Quick Entry, you would always modify a certain field in the created event so as not to create two entirely identical events. For example, After the Male 50 Freestyle, might be the Female race, or the 13 Years might follow the 12 Years. The Quick Entry Field is the field that the computer will jump to straight after creating a Quick entry Event.
The Points field allows you to set a default as to which points system each new event will default to. Of course you can change this for each event where necessary.
Next carnival representatives
Click on the Next Carnival Reps Tab. Here you can enter the Name of the Next Carnival that your participants will represent at. You can draft a letter that can be printed for each Representative.
The Map Next Carnival Events button is used to ensure that the event numbers in your carnival are the same as those which would be used in the Next carnival your competitors would represent at. This would be clicked after you have entered all of your events and when you know the event numbers of the next carnival.
Final lanes & heat seeding
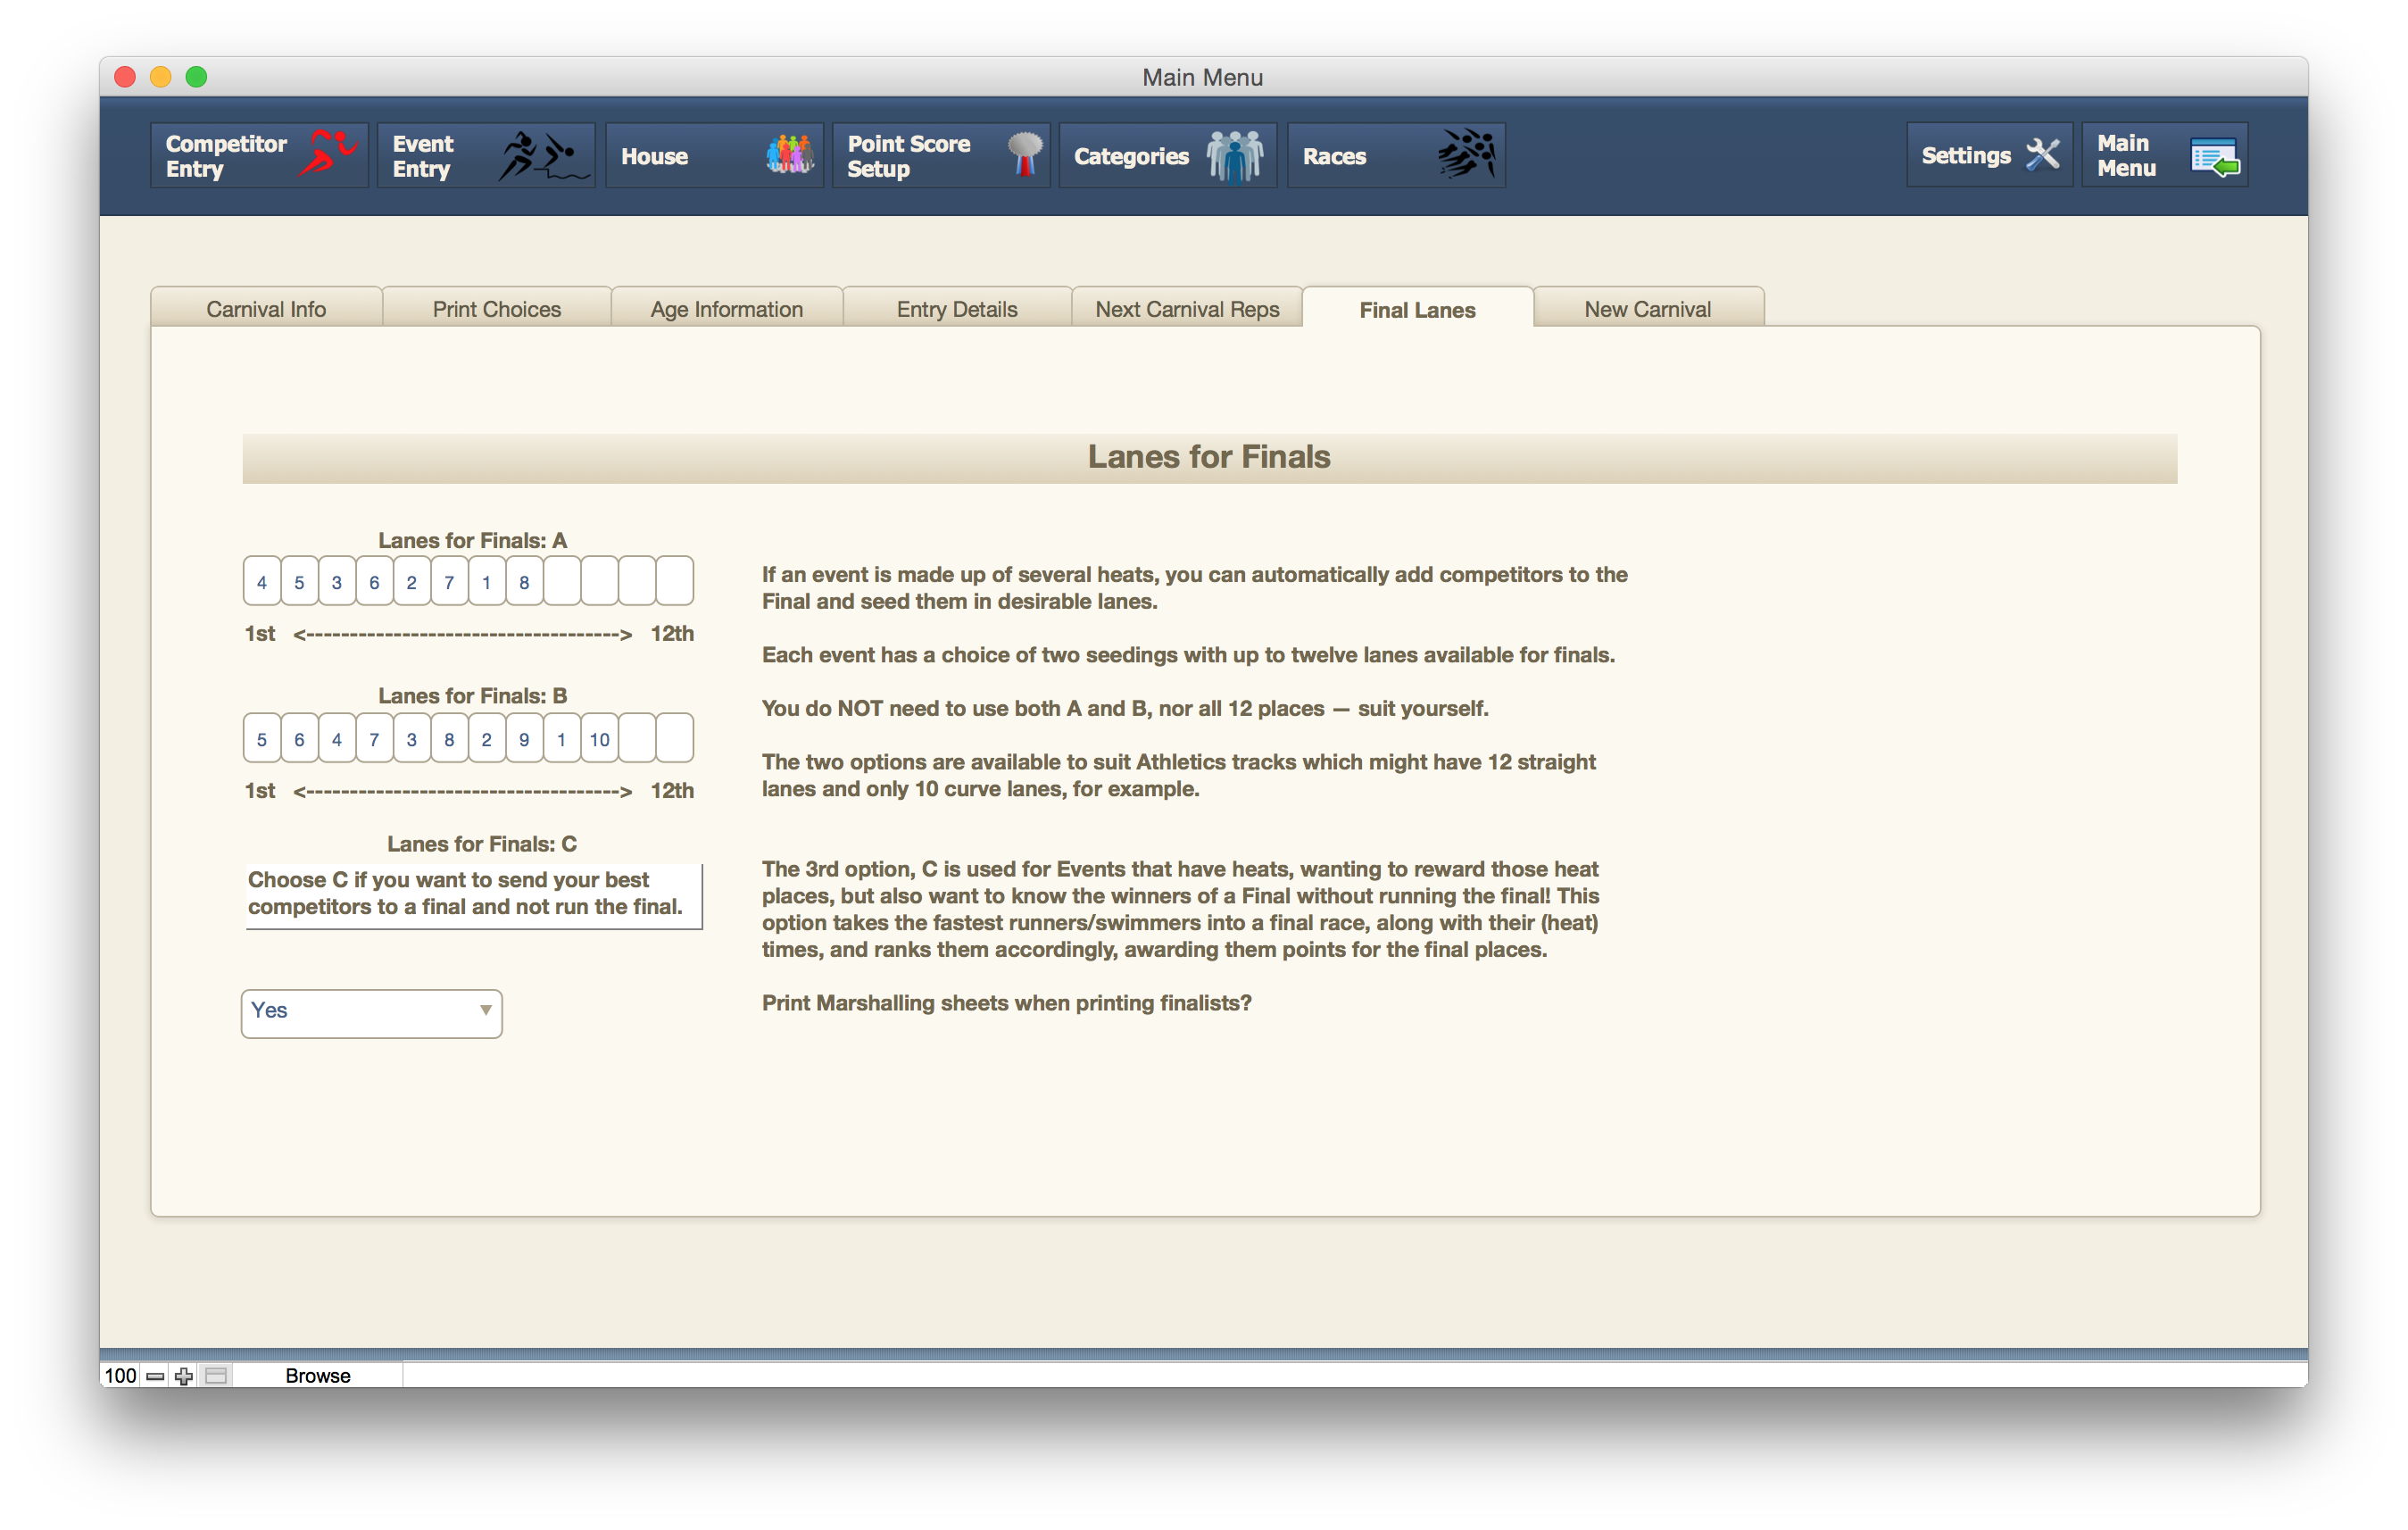
Click on the Final Lanes Tab. If your carnival has finals, you can seed the finalists into specified lanes, or seed heats based on Seeding times. It is traditional for an eight lane final, that the fastest qualifier be in lane 4, next fastest in lane 5, then 3, then 6, then 2, then 7, then 1, then 8. For example, to cater for Athletics tracks which have say 12 Straight lanes but only 8 curved lanes, there are two options for setting your default lanes, A and B. The option chosen for any given event is made when setting up the events. [Some schools have what is called ‘silent finals’. They award places for each heat, and have the fastest 8 competitors go to a final which they DO NOT run. If you do this, you will later, when setting up the heat (in Events), select Option C for the final lanes seeding. Then it is very simple to award each competitor their overall place, points, etc for that final which is never run. This will be further explained when dealing with ‘Running a Carnival’.]
When you auto-create finalists, you usually would want the Marshalling Sheet to be automatically printed. However, if you have no printer, you should set this to No.
New carnival
Your Athletics or Swimming Carnival is over and all has gone great. The next year has arrived and you have to set it all up again. The New Carnival Tab allows you to clean-out the previous carnival’s information, but leaves the Event and Record details, so that all you might need to worry about is setting-up the competitors. If you click Continue, you will then be warned — and need to click on Erase All — to erase all of the competitors’ results.
Click on the Main Menu button.
Setting up teams, house etc
Click on the House Details Button (which would be named according to your Team/House/School Preference).

On the Team/House entry screen, update the teams/houses.
Fill-in each answer pressing the Tab key to move to the next field.
Team Code is usually the first letter of the Team name.
Team Name is the Name of the Team, being the House, School, Region, etc.
Students is used when you wish to also include a winning Team based on the population of the
teams. Here, you enter the number for that population. It is often used at Regional Carnivals to
determine the ‘Small-Schools’ points winner.
Male Lane is the lane which all Male competitors for that team will default to. This can be overridden for each event, or even ignored.
Female Lane is the lane which all Female competitors for that team will default to. This can be overridden for each event, or even ignored.
Group is only used for larger carnivals where many Teams are involved. It provides a way to divide
Teams into subgroups, which might compete in certain heats together. It is used to create a formula
which can automatically generate heats and lanes for competitors in all races.
For ‘Team & Sub-Team’ Carnivals, enter the name of each sub team in the spaces provided.
Click the New Team button, continuing the process until you have entered all of your teams.
Note: From the Teams screen, you are able to navigate by clicking any of the additional buttons, in the Button-Bar.
Setting up the point system
From Main Menu click on the Points Setup button.
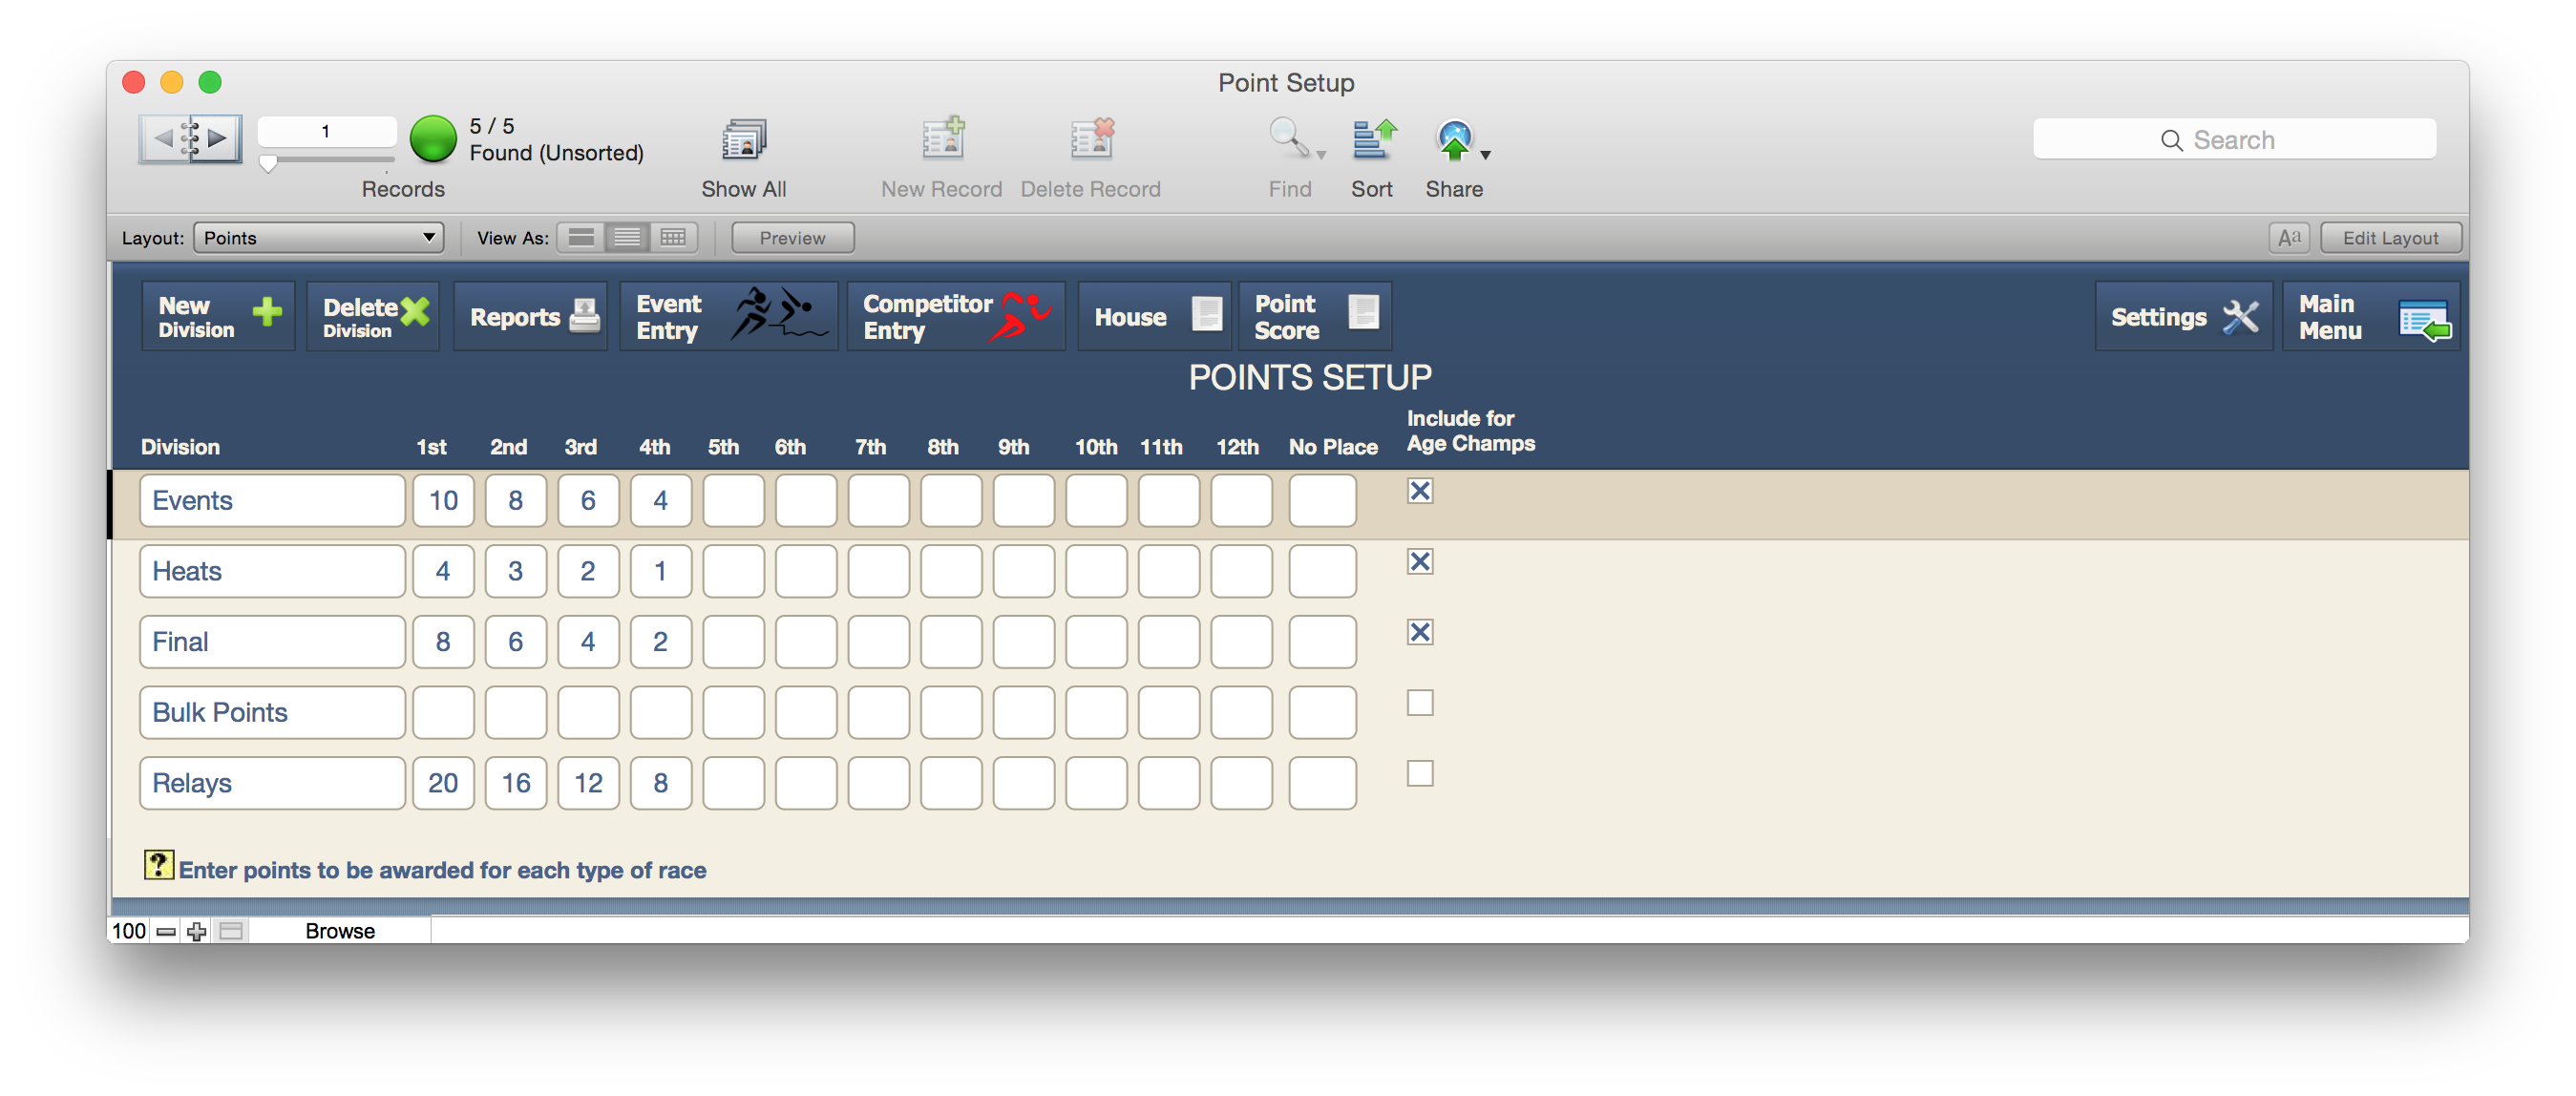
The points setup screen allows you to specify how many points competitors will receive for gaining a place in their race. Create a Division for each pattern of points that might be earned for places gained. For example, you might have Divisions called Heats and Finals if those races are worth different points. However, if all field events and straight-out-finals get the same amount of points, classify all of them to use the ‘Events’ points system.
Bulk Points is a division which must be used when you are awarding Participation Points.
The Include for Age Champs check box allows you to have races or novelty events that can earn points for a Team (House) but not be awarded to the competitor towards their Age Championship.
Setting up age and categories
From Main Menu click on the Categories button.
The Category screen appears in the corner. This is used to; Enter the ages of the competitors in your Carnival. These ages will appear in the pop-up menu on the Competitor screen, and form the available age-options for each event, on the Event Details screen.
Enter a corresponding Category for each age. The Categories are used if you wish to award ‘Category’ champions instead of ‘Age’ champions (in Preferences). Setting up races
From the Main Menu, click on the Races button.
Enter the names of the Races that will take place in the Carnival. Do not include any other details such as Age, Sex, Heat, etc. For example, Swimming carnivals would have races called, 50m Freestyle, 50m Backstroke, etc.
Setting up events
Some screens have a button which will take you to the Events Screen where you can setup and maintain the events you wish to run at your carnival. Either click on this button, or click on Event Details from Main Menu — click on Form View if accessing it from Main Menu.
Click the New Event button and click through the details of Event 1. [If the correct Categories don’t exist, scroll down to Edit and adjust the Category Menu.]

To filter the possible competitors that can appear for each event, click Event Details — check the appropriate age(s) for the event. This is not compulsory — but if you do select the possible ages for competitors, please select the appropriate option in the Carnival Preferences (described above); Aged Filtering=Yes/No
Then, either click the New Event button, and continue to build the events for your carnival or, if the next event is — for the example above — the Male 100 metres FS, click the Quick Entry Button and adjust the Sex field.
What to do if an Event contains Heats
If the event contains heats which lead to a final (whether or not it will actually be run-or- not), you should enter these extra details. This can be entered on the bottom half of that screen or in List view. For the List view option, click on the View as List button.
The additional information needed when a heat leads to a final can be seen above. You need to specify which Lane seeding you want to use (Seed A/B), the number of competitors in the final (No. in Final), whether you want the fastest times or the best places (Place or Time) and the Event number of the Final (Final No). Seeding C is used if you want to create a final that you do not wish to run. Those with the best [Select Times] are put into a final, and given their points. Their heat times are also displayed. The auto-print marshall sheet actually prints a results sheet in this case!
[You can also set up major and consolation finals, or semi-finals, by entering a 2 in the (No. of Final Races) field, and an event number for the (Prelim Final No) field.]
What to do if the Event is a Final
If the event is a final that is to be generated from a previous heat, click the check-box which is between the Event number and the Final Event number.
Note that the event name of both the heat and the final for the 100 metres is the same. Do not create races with names such as ‘100 metres Final’. The program will automatically add ‘Heat’ and ‘Final’ to all printouts, etc.
What else can be done from the Event details and List View?
If you are entering competitors into a given event, there are two ways to have the competitors automatically placed in Heats and Lanes. To assist one of these methods, the program needs to know the maximum number of competitors in each heat. This is entered in the Max no. in Races field.
In list view, clicking on any of the first 5 fields [Event Code, Event Name, Category, Sex, Points], the list will be sorted by the values in that field.
In List View, custom sorts can be performed by clicking the Sort button.
You can Find Events that match a given criteria [Find All returns all Events to view.]
You can navigate back to the original Form View, go to Reports, Competitors, View progress Age
Champions and Point Scores or go back to the Main Menu.
What else can be done?
In the Form view you can enter the number of competitors from each event that would represent at the next carnival.
There is also a help menu button and a Print menu button.
The icons above the Print menu button represent Undo, Cut, Copy and Paste.
More info on Age Filtering
When Age Filtering is ON you have to complete the possible competitor Ages for Every Event.
If the event is a Relay, or Participation Points (Bulk Points, etc) where the entrant will be a Team rather than a single competitor, DO NOT enter/check any ages for that event.
When entering competitors on the Events Entry screen, only the appropriate competitors will show up in the ‘pop-up’ list.
When entering event numbers for competitors on the Competitor screen, only the appropriate events will show up in the ‘pop-up’ menu.
You cannot use date-of-birth entry with ‘Age Filtering’ (age Preferences Tab). However, the program will automatically convert Date-of-Births to ages and change the Preference so that ‘Age Filtering’ will work.
‘Age Filtering’ will not work for Team Events that are for Mixed gender. Hence, you need to change the ‘Sex’ pop-up to Male, enter the Male teams, then do Females, then reset it to ‘Mixed’.
Participation Points
If you award participation points to the Teams (houses, etc), create an event called Participation Points, and ensure that you select ‘Bulk Points’ for the Points type. The actual Name, Type, Sex and Category fields are not important for this Event. Do not ‘check’ any Ages in the ‘allowable’ list.
Setting up Events — Advanced Option
If you need to apply a setting to a field which will be the same for a given number of events, you can make that change to those Events all at once. For example, you want the first 2 runners in all of the Track Finals to represent at the next carnival — hence, you would;
Perform a find which finds the finals (Check-Box checked) which are also Timed events.
Click into the Number of competitors to represent this event at the next carnival field. Type 2. Then choose Replace from the Script menu. You will get a message that this is undo-able! Only continue if you are sure of what you are doing! Click on the Replace button.
You can go forward through events or back to earlier events by clicking on the record pad. You can also drag the handle to move more quickly through the event numbers. It is worthwhile to try and keep your Event number and the record number the same.
You can also go straight to a given Event number (providing the record and event numbers match), by typing that Event number where the Current Record Number is and pressing <Return> Mac or <Enter> Windows.
Adding competitors (or athletes)

From the Main Menu Click on the Competitor Details button or from most other screens, you can click on the Competitors button.
You can either add your competitors manually or import them from another program. To add them manually, click the New Athlete button, and complete the First Name, Surname, Age [or Date of Birth as selected in Preferences], Team Code and Sex fields. Continue the process as desired.
Importing Competitors
Students (Competitors) can be imported into the Sports Carnival Manager from an Excel Spreadsheet, Tab-Delimited file or CSV file. Ensure that the data contains the following information: Surname, First Name, Gender, Date of Birth or Age, and House/Group.
- Main Menu -- Competitor Details
- Carnival Menu -- Import Competitors
- Navigate to the file you are importing from, and select it
- Map the following fields (Make sure you correctly align and tick the information with the centre arrow):
- First Name --> FirstName
- Surname --> Surname
- Gender --> Sex
- Age --> Age Entered or DOB --> Date of Birth
- House/Group --> Team Code
- Click the Import button, and accept Defaults.
- Click OK.
- You may need to Delete the first record you have imported if it is a header field of your database. Choose Delete Competitor from the Script/Carnival menu.
Import Details to be aware of
Use Age Entered if you are importing Age, or use Date of Birth for the Date of Birth.
The Sex field is meant to be ‘Male’ or ‘Female’, not ‘M’ or ‘F’. If you import ‘M’ or ‘F’; there is an option in the Settings —> Entry Details to fix this ‘Convert Gender’.
Placing Competitors straight into an Event
If you know what event numbers the competitors are in, enter those numbers below the competitor details, by placing the event number into the Code field. If Age Filtering is on (Settings --> Age), the Code box will act as a pop-up menu, displaying only the possible Events for that competitor.
Viewing all occurrences of the Competitor Entries
You can view (or even edit) every entry of the Athletes in all events by clicking on the Entries button (near the bottom left of the Competitor screen).
If you entered a male in a female event (or vice-versa), red circle will appear ...
Adding Teams as Competitors
For Relays or Participation points, the Teams (Schools, Houses, etc) are entered. Hence each team needs to be setup as a competitor.
This is done automatically by selecting Enter Team Competitors from the Script menu.
You will be asked whether you wish to create competitors for Male, Female or Both. Co-ed carnivals would select both. A competitor for each Team would then be created.
You might then want to add each of them into all of their relay events. [And possibly into the Participation Event (if you have one).] DO NOT enter an Age for the Team competitors!
Entering Competitors into an Event
As mentioned earlier (Placing Competitors straight into an Event), you can enter the Event number for each event that a competitor will compete in, onto the Competitor screen. This is considered a Pre-entered carnival, whereby you might know the events that each competitor will compete in prior to the carnival. Alternatively, if you have a list of who is in each event, you would;
Click on Events to go to the event screen.
Go to the correct or first Event number and begin adding the competitors to this event.
Do this by clicking into the Code field where the competitors are listed.
Begin to type the first competitors Surname [First 3 letters]. Then Click [or press <Return> or <Enter>] on the correct competitor. If you selected the wrong competitor, just click on their code and repeat the procedure.
If Age filtering is on, only the appropriate competitors will appear in the list (if the appropriate ages were filled-in on the Event Details screen. Additionally, if you enter a competitor in a race ‘for the
other sex’, a hand will appear indicating so.....
To delete an incorrect competitor, click on their name and press the <Delete> key [or choose Delete
from the Script menu].
Relays
Use the same procedure (Entering Competitors into an Event) to enter each Team into all of the Relays. You would do this for ALL carnivals [even those which are not ‘Pre-entered’] so you don’t have to add them during the carnival. For Co-ed carnivals, try and enter the Male Teams in the Male Relays, etc.
Participation Points
Again you enter each Team into the participation points event [again, this should be done prior to the carnival]. However, you might need to add each team several times, as participation points can be awarded frequently [for each Event block].
You must enter the points for a given Team into the PLACE field.
To enter subsequent Participation Points for a Team, you can either add the Team into the Participation Points event again, or just add the new points value to their existing value [this is often quicker], or do a combination of both [preferable].
For Age Filtering, DO NOT include (check) any ages on the Event Details screen.
Pre-Carnival Reports
Select Report Menu from the Main Menu (or any other screen). The first four Reports are Pre-Race Reports, ‘Athlete Event List’ can be run before and after the carnival.
Program List of Events lists all the events from the Events file. If you have Heats and Finals, these Events should be identified by the addition of (Heat) or (Final) to the Event Name.
Full Program Listing is a booklet type document which has each event and the competitors in that event, listed by Heat and Lane. It can be printed in one or two columns or a combination of both by printing a range of pages for each type.
Registration Sheets are meant to be used at the Marshalling Area. Changes to the race should be made on those sheets and they should be sent to the finish line (track and swimming). Finishing times should be entered on these sheets and finally, they are sent to the computer recorders. There are both Portrait and Landscape Registration sheets for Field events at Athletics Carnivals. Registration Sheets for non-pre-entered carnivals, prints blank marshalling forms.
Athlete List lists all competitors with their Athlete Code and can provide a list of the events they will or have competed in. You can also perform a Find (ie find all competitors in a school or ‘house’ group), then click Reports, then run this Report. It will only print those that you just found if desired.
Setting up the Records
Once the Events have been entered you can add the Records for each event. Click on the Records button on the Main Menu. Add the records for each event by clicking the New Record button, then clicking in the field below Age. When done, you can Print the Record list out and add it to your carnival book.
You will notice that the Records are now showing on the Events screen.
CARNIVAL DAY — ENTERING RESULTS
For Pre-entered carnivals, or carnivals that you have entered or imported the competitors you would enter all of the results in the Event file — by first clicking on an Events button. All of your events should be in sequence, so you would usually start at the first record which is Event 1.
For Pre-entered carnivals your competitors will be already entered — you’d only need to enter their times, etc. You would;
Enter the results for a competitor. Note that minutes, seconds and decimals should be entered as 2:21.05 for example. [13.25 is fine for 13.25 seconds or 13.25 metres, however, 2 minutes 20 should be entered as 2:20.0 or 2:20.00]
If you want to manually award a place for competitors you can, otherwise, after you
have entered all of the times [or distances] for an event, click the Rank button —
which automatically Ranks each competitor and awards all the points.
Note: Use the Tab key to go from one competitor to the next, after clicking in the first competitor’s time box. [Preferences set to Pre-entered]
Click the Print button to print the results of the event. (Remember the Printing Preferences are used and are displayed and changeable at the bottom right of the screen.) Results marked with NR or ER denote New or Equal records.
If you need another Marshalling Sheet (Result Sheet) you can print it by selecting Item 6 from the Script Menu, Print Marshalling Sheet.
Note: Records are acknowledged during the Print step, whether to screen or paper.
Competitors can be changed by clicking on their Athlete Code. Begin to type their surname for the pop-up menu to go straight to that entry. Enter when the correct person is selected.
Additional competitors can be added at the bottom of the list, by clicking into the Athlete code box and beginning to type their Surname. Enter or click or the correct name.
You may delete competitors, by selecting the competitor (Click on their name) and choosing Item 7, Delete from the Script menu. You must select Related when deleting. This is very dangerous as selecting Master will delete the entire Event and all of its competitors!
To automatically send winners to a specified final, click the ‘Create Finalists’ button.
Click the record pad (top left) to go to the next event.
Multiple Heats within One Event
If an event contained several heats but you do not want to run a final. you could either; Enter the times of each competitor and have the program Rank them all, thus working out the actual event places. This is fine for finding actual event winners, but doesn’t provide well for heat place-getters.
Create a ‘Silent Final’ for the Event [a final that is not run].
Select for the Event (in list view) the Seed (A/B) as ‘C’.
Enter the times and places of all the heat winners (place-getters) [this way they all receive ‘Heat’ points for their achievements].
Send the fastest athletes from this event to the final [by clicking the Create Finalists button].
Make sure you selected create finalist from their time (List view).
When names only have been pre-entered, you would decide how many places from each Heat or Event you want to enter into the program.
The scenario is basically the same as Multiple Heats within One Event above, however, as the competitor or Result sheet is made available to you, you would first enter them into the Event, by clicking on the Code field and beginning to type their surname.
No Competitor Pre-Entry
Results would be entered on the Competitor screen.
Add athlete details, then enter the event code and their result. To add additional results for a competitor you've already added, use the find button to find the record and add the result only.
Do NOT add the same athlete details twice! This would split up their age champion points.
You need to go to the Event file to Print results or automatically rank that event.
This is not a desirable way to use any Computerised Carnival program.
Reports
During the carnival you can review the point score or the age champions by clicking on their respective buttons. The print status of these buttons is that of the print preferences selected earlier (usually at the bottom right of the screen). You can also print an athlete’s events from their screen.
All other reports are performed from the Report Menu screen. At this stage you would select the Post-Race Reports. However, Full Program listing (single column), Athlete list (with Events), and Athlete Event Lists will also show competitor results if printed after the Carnival.
The ‘Next Carnival Reps’ button takes you through a series of steps to print a listing and some letters to competitors that qualify for the next carnival. You can also export the details of the reps for each event to a file called ‘Reps.txt’ or to be used at the next Carnival selecting SCP. The letter is that entered in your Preferences. Those to qualify would have been designated on the Event screens. You can sort them alphabetically, by event number or by team.
When printing the Carnival event results, you have an option to check for records first. Do this if you did not print (to printer or screen) the results of each event from the events screen.
Records
After the Carnival you can select the Records button from the Main Menu and update the new and equalled records. The winner of an event without a previous record would be automatically added to this file. Carefully check your records file when done and edit as necessary.
Print the new records, or view them in different sort orders in the list view.
Two types of printouts are available. ‘Current Sort’ virtually prints what you are displaying on the
screen, in that order. Standard Form uses headings for each Event and lists records as a summary.
Your first carnival will automatically create a records file for you. You do need to check that multiple
records are not created for one event if heats and finals are both run.
Help
Basic Online help is available from most screens by clicking on the question mark (?) at the bottom left hand side.
Note: If you are previewing instead of printing, and the Continue button is not showing, press the <Enter> key (not the <Return> key) [Windows users press Shift Enter] to continue.
Tips
When viewing Competitors or events by list, a ‘Sort’ button allows you to specify the order of the list you are viewing.
If you use the Auto create finalists, set the Auto Print Marshalling sheets to ‘Yes’ in the ‘Final Lanes’ Preferences — then the finalists will be created and Marshalling sheet printed all in one go.
Keep your Event number matching the record number.
For a pre-entered carnival, let the program put each competitor in a heat and lane. Auto-Entered lanes
are based on the competitor’s Team Group and Male Team Lane. You must specify the maximum number of competitors in a race by going to the Events screen, and clicking the List view button. To automatically lane competitors, go to the Athletes file by clicking Competitors, click the Entries button, Find the Events you wish to Auto-Lane, and select Auto-Lane from the Script Menu. [Example. To find events 5 to 10, click Find, then enter 5...10 in the Event Code field and press Return <Enter>. To find all Events, click Find All.]
Advanced users can auto Heat and/or Lane competitors by applying a Mathematical Formula. To Auto Heat competitors based on their Team Group: Click on Competitors, click on Entries, Find the Event numbers you wish to Auto Heat. Click in any Heat field and select Replace from the script menu. [This is not undoable, continue at your own risk.] Click on the Specify button and enter the formula: Teams::Group Click OK and Click replace. This will put every member from a team in a heat specified by the teams group. Of cause very detailed and powerful formulae are also possible. Send an email for more advice.
About the Create Finalist Button
The Create Finalists button on the Events screen is used for sending competitors from an event to another (or 2 other) events based on their places or their times. If no ranking or places have been awarded, the process is still possible.
First, in Main Menu -> Preferences -> Final Lanes, enter the lanes you want 1st, 2nd, etc. to go into. Second, many scenarios are possible, these are examples:
Best 8 competitors from Event 1 go into the final which is Event 50. From Events Screen, for Event 1 enter 50 in the Event ‘Final No’ field. Click List View and enter 8 in the ‘No. in Final’ field for Event 1.
Best 16 competitors From Event 1 go into the two semi finals which are Event 50.
From Events Screen, for Event 1 enter 50 in the Event ‘Final No’ field. Click List View and enter 8 in the ‘No. in Final’ field for Event 1 and 2 in the ‘No. of Final Races’ field.
Best 8 competitors From Event 1 go into the Major Final which is Event 50 and the next 8 competitors race in the complementary final which is Event 51. From Events Screen, for Event 1 enter 50 in the Event ‘Final No’ field. Click List View and enter 8 in the ‘No. in Final’ field for Event 1 and 2 in the ‘No. of Finale Races’ field. Also enter 51 in the ‘Prelim Final No.’ field.
NB. The program defaults to the highest placed competitors go to the final instead of the best times. This is useful if you award places manually for each of your heats, and the first x places, for example, are automatic finalists.
Where more than one final is created (eg. semis), the marshalling sheets will not auto-print. Go to the correct event and choose Print Marshall Sheet from the script menu.
NB. When creating finals using the Seed Option ‘C’, the competitor Heat times are transferred to the final. Places are also awarded according to your selection (Time or Place) and the points are awarded automatically. The Marshalling sheet which might normally be printed (Preferences Option), is substituted for a results sheet.
Auto-Lane — First perform a find for the Events to Auto-Lane. The Auto-Lane function is aimed at simplifying Heat and Lane allocation of pre-entered carnivals where competitors are not always racing in a lane allocated to a team. The function (available from Competitors -> Entries -> Auto-Lane from script menu) allocates lanes until the maximum number for that race has been reached, then creates another heat. The maximum number for a race must be entered.
For example, if the maximum number of each heat in Event 1 is 8, from events screen, click List View, for Event 1, enter 8 in the ‘Maximum No. in Races’ field.
The Lanes are allocated according to the current sort order, so you should first — find the event numbers you wish to auto lane, second — sort by Event Number, etc.
Auto-Lane Team Lanes — This option (available from Competitors -> Entries -> Auto-Lane Team Lanes from script menu) puts all competitors in ‘Timed’ events into their team lane.
The ‘Quick Entry’ of Events always duplicates the existing event and adds one to the event number. Therefore the next event number should not already exist. You then can change the necessary field(s) that make this event different. This can make event data entry much quicker.
If you have participation points or relays, Team (or house) competitors should be entered into these events. To simplify the matter of creating a competitor for each team, you can select ‘Enter Team Competitors’ from the script menu [Athletes (Competitors) file]. You will then get the option to enter Male, Female or Male & Female competitors for each team (house).
Seeding Heats or other Time Events
If competitors are to be pre-entered and their seeding times are available, you can seed their races so they will be placed in Heats & Lanes according to your Main Menu --> Final Lanes Settings. From the Events screen, choose ‘Enter Seeding Details’ from the Script menu.
Here you can enter Seeding Times for each competitor. When you have finished entering the competitors for the event, click the ‘Autolane’ button to place them into heats and lanes, based on (1) the number of competitors in a race (List View) and (2) the Final Lane Preferences (Main Menu --> Settings).
Entering competitors into Events
From the Events screen you begin to type the competitor’s Surname [First 3 or so letters]. Then Click [or press <Return> or <Enter>] on the correct competitor.
When using FileMaker Pro (or the Standalone version), only Male competitor names will appear for Male events, and Females for Female events. Additionally, if you enter a competitor in a race ‘for the other sex’, a stop-sign will appear indicating so.
The Sports Carnival Manager © Copyright 1998-2015 by Type and Design, All rights reserved.
DISCLAIMER
The author, David Emery, makes no warranty or representation either express or implied, with respect to this program and manual, its quality, accuracy, merchant ability, or fitness for a particular purpose. As a result, this program is sold “as is” and you , the purchaser, are assuming the entire risk as to its quality and accuracy. In no event will Type and Design be liable for direct, indirect, special, incidental, or consequential damages resulting from any defect or inaccuracy in the Sports Carnival Manager.